RTE MIS Product Documentation
Student Management
In the Student module, the Applicant will get all the information regarding section 12(1)(c) scheme. An applicant can apply and participate in the admission process to benefit from this. There should be some specific steps that applicants need to follow, which are explained here.
Student Application -Dynamic Fields
In the student management module, some fields should be required to be built or pre-filled with information to display in the application form. Some fields are dynamic, which differ for different states; some fields are static, which are once deployed on the form and do not need modifications. There is a predefined logic to display the list of schools eligible for particular applicants.
In the Student application - dynamic fields are created, which may differ for different states. In this section, the below list of information is to be incorporated-
- Details of location - Location information with proper nesting should be displayed in the student application form. Nesting should be like District → Block → GP/Municipal Corp. → …/Ward → Habitation
- Applicable categories - There should be two broad categories through which an application can be admitted to selected schools.
- DG—In disadvantaged groups, some subcategories come, which are SC (Scheduled Caste), ST (Scheduled Tribe), Disabled (40% or more), Primitive Tribal Group, Forest Dweller Scheduled Caste, HIV, Orphan, etc.
- EWS - In the economically weaker section, we can see that applicants who are economically weak will be eligible. In this category, major BPL certificate-holder families will be present.
Categories in these fields may differ for different states. Currently, these fields are based on existing information and for understanding the requirements.
Student application - static fields
In the static fields section, that list of information must be updated once at the time of configuration and not require any further changes. List of such fields are listed below-
- Genders - Boy, Girl, Transgender
- Caste - ST, SC, OBC, GEN, BC, OC
- Religions - Hindu, Muslim, Sikh, Christian, and others
- Siblings - If yes, then this additional information to be collected (Sibling Name, Current Class, School, aadhar card (4 digits))
- Single girl child - Yes / No
- HIV - Yes / No
- Orphan - Yes / No
Fields from Point d to g are optional and based on States choice; these will be visible if the State wants these filtrations. There should be an option for the App admin to enable or disable these fields.
In case the State goes for the above categories (from point d to g), there are some certain validations to be applied; those are
- If the applicant selects the single girl child, then Orphan and Sibling should be disabled to select.
- If the applicant selects an orphan, then a single girl child and Sibling should be disabled.
- If the applicant selects Sibling, then Orphan and single girl child should be disabled.
- HIV should be enabled in all situations.
Other than the above categories, some documents are also required to identify the applicant and the information provided by the applicant.
- Birth proof - ANM Registered Card, Anganwadi Card, Hospital Birth Certificate, self-attested letter etc.
- Address Proof - Aadhaar card, Ration card, Bank statement or passbook, Voter ID card / Voter ID card, Driver license / Driving license, Gas connection bill (which is not more than 3 months old) ), Farmer Photo Passbook (KCC Card), Registered Lease/Sale/Rent Agreement (Kirayanama), MNREGA Job Card etc.
- Identity Proof - Aadhaar Card, Voter ID Card / Voter ID Card, Driver License / Driving License, Kissan Photo Passbook (KCC), Ration Magazine, PDS Photo, Card, Photo Bank ATM Card, PAN Card, MNREGA Job Card etc.
Student application - List of eligible schools
While applicants fill out the application form, they must select schools for admission. Applicants need to add a preference of schools to which they want to get admitted.
- A list of schools will be displayed based on the current location selected (Habitation), the age of the student, and the gender of the student.
- Firstly, select and shortlist the mapped schools based on the habitation selected.
- Then based on the age criteria entered, again make a filter on selected schools, shortlist only those schools who have declared entry class on which applicant is eligible to get admission.
- Now, based on the gender selected for applicants, one more level of filter is applied to selected schools, like if the selected gender is Boy. Girl's schools should not display; if the selected gender is Girl, then boy's schools should not display, and if the selected gender is Transgender, all selected schools will display.
- Once the list of schools is displayed (after applying all the above filtration), there should be a column to select the preference and prioritize the schools to get admission.
- To set the preference, there should be a dropdown list, which should be filled with numbers that contain the maximum number of schools displayed on the form.
- Also, duplication preferences should not be possible.
- If the school runs in two mediums, in that situation, the school should display two times for two different mediums, and it should be the parent's choice to apply for both mediums or anyone.
Student Application
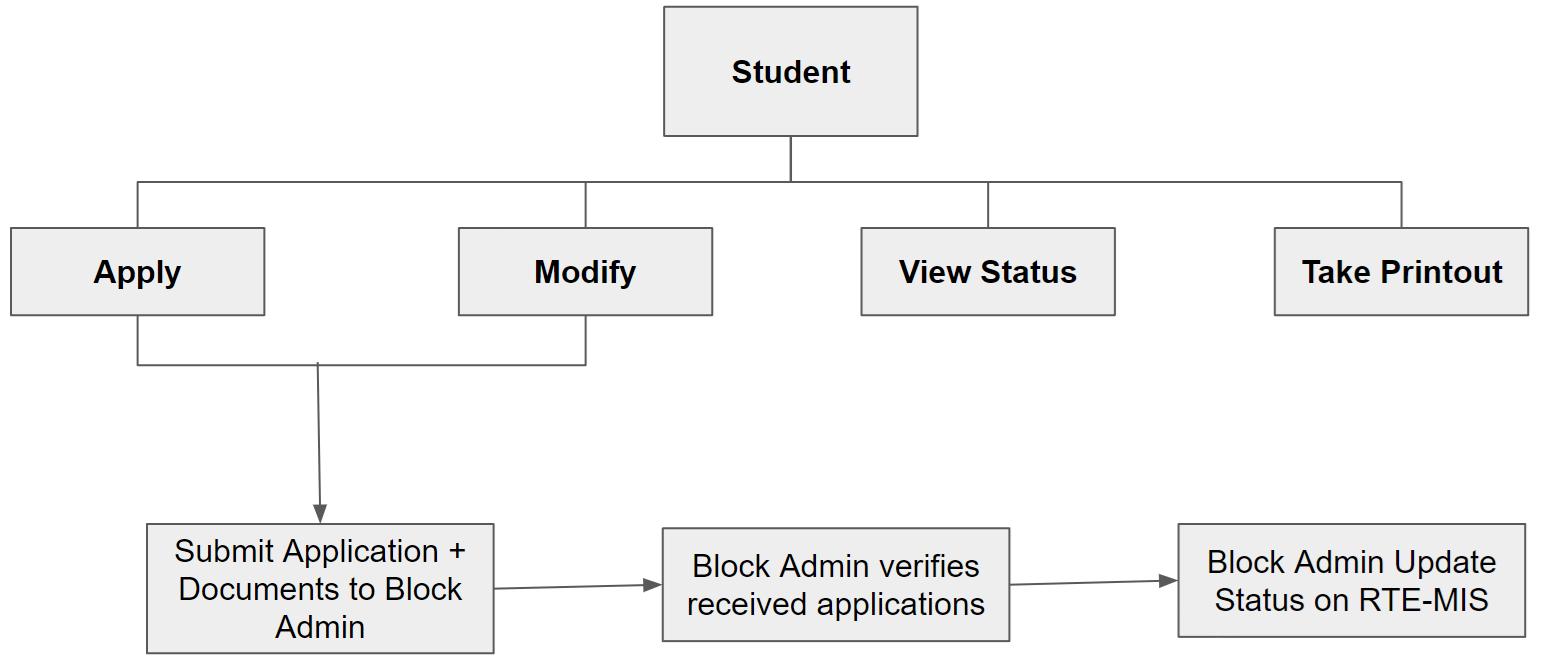
In the Student Management module, parents apply for their kids to benefit from this scheme. For these, a parent should follow the below process:
- Applicants can open the application and first validate the applicant's mobile number. Once the mobile number is validated through the OTP, then changes in the mobile number are impossible.
- While validating the mobile number from the backend, check for existing mobile numbers on the database for the current academic year.
- If the entered mobile number is not in the database, a new application form will be generated, and the applicant can apply for the running academic cycle.
- If the entered mobile number already exists for the current academic year, then -
- Applicants will get two choices: either they can fill out an application for another child or modify an existing application.
- If the applicant chooses the first option, then a new application form will open, with pre-filled information of parents (Parent Name, mobile number, adhar card, Caste, religion), which will be ready only.
- If the applicant chooses the second option, then the applicant is redirected to the modification page. In this situation, no validation check is required as the mobile number is already validated, and the application will be available to modify applicants.
- If multiple applications are registered with the same mobile number, then a list of all applications should be displayed with basic information, and by clicking on the application number, a form will be available to make modifications.
- Fields required in student applications should be tab-delimited: Parent information, student information, Address information, Document Details, school selection and Declaration and application. Details of information to be collected from the applicant are detailed below:
-
Parent Information-
- Father Name
- Mother Name
- Guardian Name
- Adhar Card (Father) (Last 4 digits only)
- Adhar Card (Mother ) (Last 4 digits only)
- Adhar Card (Mother ) (Last 4 digits only)
- Adhar Card (Guardian ) (Last 4 digits only)
- Father/Guardian Mobile number
- Caste
- Religion
-
Student Information
- Student Name
- Date of Birth
- Gender
- Adhar Card (Optional) (Last 4 digits only)
- Is Single girl child
- Siblings - Yes/No
In case of yes, some additional information to be collected- Sibling Name
- Current Class
- School Name
- aadhar card (4digit)
- Single girl child - Yes / No
- HIV - Yes / No
- Orphan - Yes / No
-
Address information
- District
- Block
- GP/Municipal Corp.
- …/Ward
- Habitation
- Residential address
- Pincode
-
Document Details
- Birth Proof (For DOB verification of applicant)
- Identity Proof
- Address Proof
- Category proof (For which applied)
-
school selection
- List of schools from List of eligible schools
- Selected and shortlisted list of schools to display
-
Declaration and submit
- A check box for declaration from parents
- After a preview of the whole application, the application should get submitted
- After application submission, an SMS update will be sent to the applicant's registered mobile number, and a print option should be displayed on the portal.
-
Parent Information-
- By following this validation, we can reduce the opportunities for the choice center, school admins and other persons to add their number on the application form other than the parent's mobile number.
- Also, while adding the student and parent's basic information, click on the next button, then check for the duplicity of the application; if it exists, ask them to modify the existing application.
- To check duplicate applications, check the combination of student name, student DOB, parent name and parent Aadhar number (take last 4 digits only).
- DOB will check on 31st March of every year. Applicants should complete 3 yrs till 31st March to apply and less than 6.5 years. ( Configurable by the state )
- Log should maintain for applications status changed and display on application status view.
Student Application Print
At the end of the application submission/modification, there should be an option to print out the application. There should be two ways to get an application printed. One is that immediately after the application submission, an automatically printed form should display either in a pop-up or by providing a print option. The second is that there should be a menu from where users can print out their field application whenever they require.
To get a printout of the application, the applicant must enter the application number in the search field and click the view button. After clicking the view button, a filled application form will appear, and an option to take a printout of the application should be displayed, from where users can take a printout of the application for their further reference.
Student Application Modification
Applicants can modify the application by having the OTP verification of registered mobile numbers.
- If applicants want to modify an existing application, they first need to enter their registered mobile number. Through the OTP, they validate the mobile number.
- If the mobile number is validated, the applicant can see the list of applications registered with the same mobile number (that may be one or more than one).
- Now, from the application list, parents can select the application ID on which they want to make changes.
- Once the applicant clicks on the application ID, the whole application will open in the edit format, and the applicant can change all information.
- If applicants change any of this information, Location details, DOB, and gender of student, then the selection of school should be clear, and the applicant needs to reselect the schools with the preference.
- In the case of the second application round, the application status should not be changed if any applicants do the modifications.
- Allotted applications and after allotment changed status applications like admitted, did not come to school and dropout applications can not make further changes on the application; they will not be considered in the current academic year.
- If the application is verified and allotment is not done. Applicants can make modifications only on the school selection tab; other tabs are blocked for them, and in this situation, the application status remains the same.
Student Application Verification
Once the application is submitted and parents physically provide the documents, including the application hard copy. Then, the block admin role will start. The block admin needs to verify the application and all necessary documents and then update the portal status.
- To update application status on the portal, block admin should have a panel from which a block admin can see the list of applications they received under their block.
- In this panel block, the admin can see the whole list of applications they received.
- There should be a filtration option by school-wise, preference-wise (optional), class-wise and medium. Block admin can perform the filtrations or combinations of the above filter options.
- A List of applications will display based on filtration applied.
- Block admin needs to select the application ID to which they want to change the status.
- After clicking on the application ID, a detailed application form will be displayed in read-only mode, and below, there will be two options: one is to change the status, and another is to write remarks to justify the status. By default, the updated date will be uploaded to the database.
- In case a student application needs a modification after the application registration/modification window has been closed. In that case, the block admin can modify the application on behalf of the applicant.
- For this OTP validation is required. In case of making changes on Location details, DOB or Gender of a student, then school selection is again needed (this can be changeable till the verification window is open; also, allotted applications can not be changeable by block admins).
- SMS will go to registered mobile numbers when the application status changes.
- Log should also be maintained and displayed on the application status view page.
Student Application Modification (by block admin)
Block admin can modify the application only when the application window is closed for the parents and the verification process has been started. During the verification of applications, if the block admin finds any modification on the existing application that should be modifiable, the applicant can modify the application by having a consent letter from the parent and by validating the application through OTP.
- Similar to the application modification made by parents (as in point 6 from the student management Module), block admin can modify every application information.
- Notes of the same point (point 6 from the student management Module) should be followed here as well.
- If the block admin modifies the application, then the application status should directly move to the verified status, and an SMS notification should be sent to the parent's registered mobile number.
- There should be a declaration option before the application submission for the block admin; that is, they are doing modifications on a requirement basis and with the permission of parents or applicants.
- After submission, the print option should also be displayed on the page.
Search and filter students
- There should be a view panel from where admins can view the list of whole applications and should have the option to apply necessary filters to get a more productive view of applications.
- There should be an option in block admin’s login and District admin’s login to search a particular application by having the option to search by application ID, mobile number, name of student, name of parents, etc.
- By application status or as per selected school, there should be an option to search applicants.
- Fields displayed on the view panel are - application number, student name, Father Name, Guardian Name, and Mobile number.
- There should be another view option through which, as per the school selected, the application view can be possible.
- Admins can select the school name from the list, and then the list of applications for those who have applied for that particular school should be displayed on a different list.